To
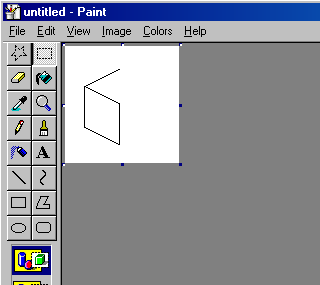
begin our cube we must first draw up an outline. When drawing
your outline, think of it as a 2D square, skewed into a 3D perspective.
Draw one side of your cube using the lines that we have discussed
before. This is done using vertical lines for the sides of the
cube and the angled lines for the top and bottom edges. You can
see below my completed side for my cube.
 Figure
1.8
Figure
1.8 |
As you can probably see, I have included the middle line of the
shape so I can line up the mirrored piece in a moment. Now once
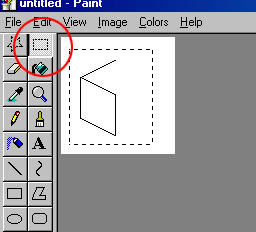
you have got your side done and you are happy with it; drag a
selection around the image using the selection tool as shown below.
 Figure
1.9
Figure
1.9 |
Next go up to the edit menu and select copy. Alternatively you
can simple press the keyboard shortcut of ctrl+c. Once you have
done this you will need to change the masking options for your
copied selection. This is achieved by clicking on the second icon
which looks like a bunch of shapes on a yellow background, with
a floating selection. As you can see the floating selection does
not have a white background like the alternate icon above it.
This simply means that and colours in your selection that contain
your current background colour on the palette, will appear transparent.
Below I have highlighted the mask selection box that you need
to select, with a red circle.
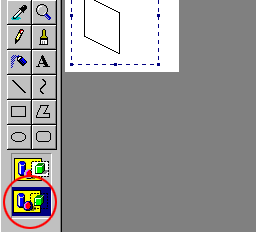
Figure 2.0 |
Ok now that were past the tedious part of mirroring and getting
your selection backgrounds transparent, we can focus on creating
the rest of our cube. Lets start by again viewing the edit menu,
but this time selecting paste instead of copy. Again alternatively
there is a keyboard shortcut that saves you having to use the
mouse, pasting something on to your canvas is simple a matter
of pressing ctrl+v. Okay, after you have pasted a cloned image
of your selection should appear on the canvas. Do not click anywhere
on the canvas once you have this floating selection, or youll
have to undo the process (ctrl+z) and start all over again. Below
you can see my floating selection of the cube side I copied and
pasted on to my canvas.
 Figure
2.1
Figure
2.1 |
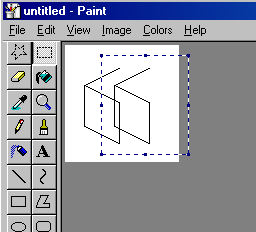
Right, now we are going to move the selection across to the other
side of the cube that is already drawn up. Hopefully your white
background is transparent and the only things visible and moving
are the lines that make up the side of the cube. Once the selection
is positioned we will need to flip it so it mirrors the other
side of our cube outline. To mirror the selection we select the
Image menu and then select the option Flip/Rotate (shortcut ctrl+r).
A popup menu should appear as shown in the example image below.
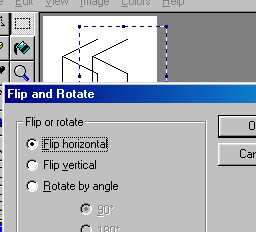 Figure
2.2
Figure
2.2 |
Now we want to only flip our selection horizontally so we make
sure that the horizontal option is selected. Once done click the
ok button and you should return to the canvas with the selection
mirrored and ready to be joined to the rest of the cube. To do
this simply move the selection across so the middle line overlaps
the middle line of the already made side. Well done, youve (hopefully)
just completed your first outline for a basic isometric cube.
It should look something similar to the image below.
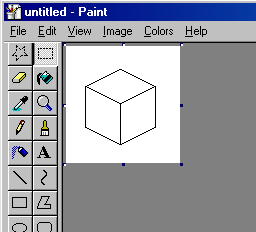 Figure
2.3
Figure
2.3 |
Once we have the outline completed its time to colour or cube.
Lets use a nice green for this cube. In order to create a sense
of 3D within the picture different shades of the same colour are
used to create a light source. A light source is simple where
the main directional light would be shining from, with the appropriate
shadows, light and darkness to follow. For this example our light
will be shining from the upper top left of our canvas as shown
below. Please note that you dont actually need to draw on your
light source as I have done in my example. You can if it helps
though but it wont be there in the final product.
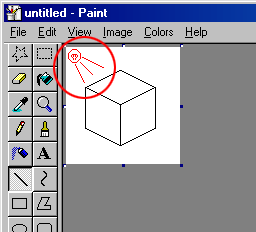 Figure
2.4
Figure
2.4 |
The light source is always up to you but in most of my work it
usually is in the upper top left of my canvas (we will cover this
in a later chapter). Now we can select our green colour. We can
do this in many ways, one of the easiest being simply selecting
the colour green from the pre-defined palette on the bottom toolbar.
Asides from being too bright this green is extremely ugly and
over the top. We need to dull it down a bit, but not too much
as to have a faded appearance (well you could use the faded look,
its really up to you.) Lets now double click on the light green
(almost neon) colour from our palette at the bottom of the screen.
I have again outlined the step in a red circle below.
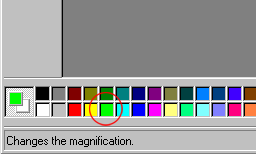 Figure
2.5
Figure
2.5 |
Upon doing this a popup menu box should appear like below. It
contains a whole series of boxes, each containing the default
colours. We want to use the advanced options to alter our colour
so we need to click on the define custom colours button at the
bottom of the popup menu. This will widen the popup and you now
should have a large colour selection box consisting of all the
colours you could imagine! See below for what your screen should
look like by now.
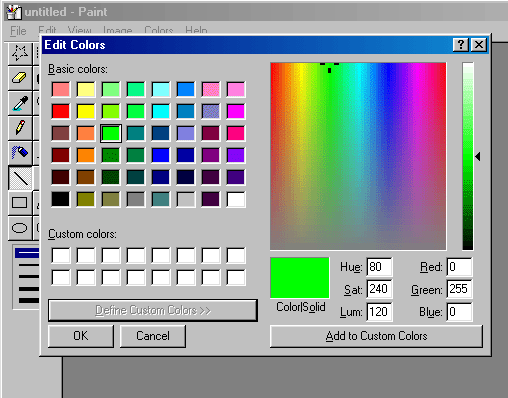 Figure
2.6
Figure
2.6 |
To change our default ugly green to a nicer green colour we need
to drag the small crosshair shape that is currently up the top
of the palette. It is here by default because we have selected
the ugly green colour before-hand. If we were to select a different
colour it would appear in a different place. To change our colour
we need to affectively alter the hue and saturation of it. The
hue of our colour is the actual colour we see, whether it be red,
green blue etc. The saturation is how much of the colour is retained
before it simple fades and you are left with a black or grey colour.
The more saturation the brighter your colour, the less and obviously
the darker and washed out it is going to be. To get our colour
that we want to use for our cube we simple drag the crosshair
to about the middle of the palette, still staying within the green
colour sections. You can make your green a lot more natural looking
by adding some yellow to it. This is done by dragging the cross
hair into the part of the palette where green meets yellow. Remember
to achieve this colour you will always need more green colour
than yellow. Below you can see where I have positioned my crosshair.
I wanted a more natural green colour for my cube; you can choose
what you want to use it doesnt really matter. Once you have decided
on a colour make it a bit darker using the side vertical bar that
shows your colour. To do this, simply drag the slider down until
the colour is dark enough.
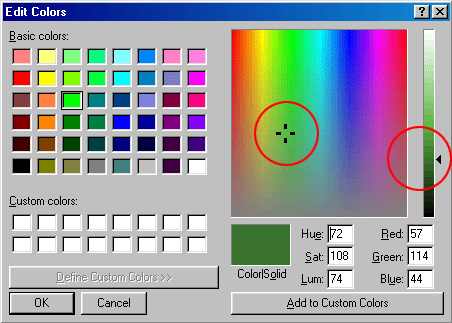
Figure 2.7 |
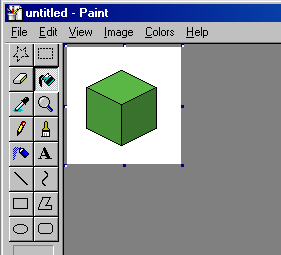
Now that we have our colour chosen click the ok button and it
should appear as your foreground colour in the little foreground/background
box next to the colour palette. Now we can simply get our fill
tool (the little paint bucket being tipped over) and click within
the right hand side of our cube. The colour should fill the white
part within the lines with our colour we just created. As it is
the darkest side of the cube (remember our light source), it needs
to be a tad darker than the other sides. The opposite side (left
side) needs to be lighter than the right side so we repeat the
colour process but this time we dont touch the actual colour
selection part but jump in and adjust the brightness of our colour
so it is brighter than our colour we used before. Once this is
done fill the other side of the cube. Repeat this process of filling
with colour to the top of the cube, making the colour even lighter
than the left-hand side colour. Now you should have something
similar to below.
 Figure
2.8
Figure
2.8 |
|